When you record hundreds of free screen recordings using Screen-Cast-O-Matic, your video library can quickly get disorganized. You need a way to manage and store your recordings so they don’t get lost in your ever-growing library.
Learn how to add and manage channels in your Screen-Cast-O-Matic account in the tutorial below.
What Is Screen-Cast-O-Matic?
Screen-Cast-O-Matic is a screen recording software that allows you to capture free screen recordings up to 15 minutes in length. You also have an unlimited amount of videos that you can upload to the platform without having to pay extra.
You are required to download the software, but it won’t show up on your computer unless you launch the recorder from the website. It does have a video editor, however, it’s only available in the premium version.
Screen-Cast-O-Matic isn’t the only screencasting software out there, but it does give you options for recording your entire screen, your webcam, or both for a picture-in-picture display. When you choose to record your screen, you can change the aspect ratio and even choose which portions of the screen you want to capture.
You do have an option to record microphone audio, but if you want to record computer audio, you’ll need to upgrade to a paid plan.
Adding Channels in Screen-Cast-O-Matic
Because you are able to record an unlimited amount of videos, your library can become disorganized and unmanageable. This is why adding channels is useful for finding and sharing your screen recordings.
Here’s how to do this:
- Log in to your account.
- Hover over Channels and click Add Channel.
- Enter the Title and Description of your channel. Check the Password box if you want to require a password to prevent others from viewing your channel.
- Click Ok when finished.
You will see your newly created channel listed under the Channels section on the left-hand side. Hovering over the channel will reveal three different options that let you share, edit, or delete your channel.
Selecting the Delete option will bring up a prompt asking you to confirm your decision. Once you delete your channel, you will not be able to recover your deleted channel. However, none of your actual videos will be deleted.
Sharing Your Channel
Clicking on the Share option for your channel will bring up a direct link for sharing, and it will also allow you to create a custom link for your channel. You can copy and paste the link to share your channel anywhere across the web.
You can also click on the Share icon next to the direct link for use in email, Facebook, Google Classroom, Twitter, and Microsoft Teams.

When finished, click on the Done button to return back to the main screen.
Managing Your Channels
Once you’ve created your channel, you can start adding videos. You can do this either by adding them individually or in bulk. Here’s how to do both.
Adding Videos Individually
- Hover over the video you want to add, and a set of icons will appear.
- Click the icon with four lines and a down arrow.
- Select the checkbox next to the channel where you want to upload the video.
- Click Ok when finished.
Now, you can click on your channel on the left-hand side, and you’ll see your video correctly assigned.
Adding Videos in Bulk
- Click on Manage Uploads
- Select the videos you want to upload.
- Click the Choose Action dropdown, and select Add selected to a channel. Then, click Ok.
- Select the checkbox next to the channel where you want to upload the videos.
- Click Ok when finished.
You can navigate to your channel and see the selected videos you’ve chosen. You can also use this method for a number of different options, including:
- Removing selected videos from channels
- Deleting selected videos
- Copying selected videos to a different channel
- Moving selected videos to a different channel
Reorder Your Videos
Once you’ve added videos to your channel, you have the option to reorder them. This lets you place specific videos at the top of your library. Here’s how to do this:
- Navigate to your channel.
- Click the Reorder button.
- Click and drag your video into the slot you want.
- Click Save Order once finished.
Your rearranged videos will now be saved in this order. You can also toggle between Gallery view and List view by clicking on the icons on the far right of your screen. While Gallery view will list your videos side-by-side, List view will display them one on top of the other. You’re able to reorder your videos regardless of the view you’ve selected.
Paid Features for Screen-Cast-O-Matic
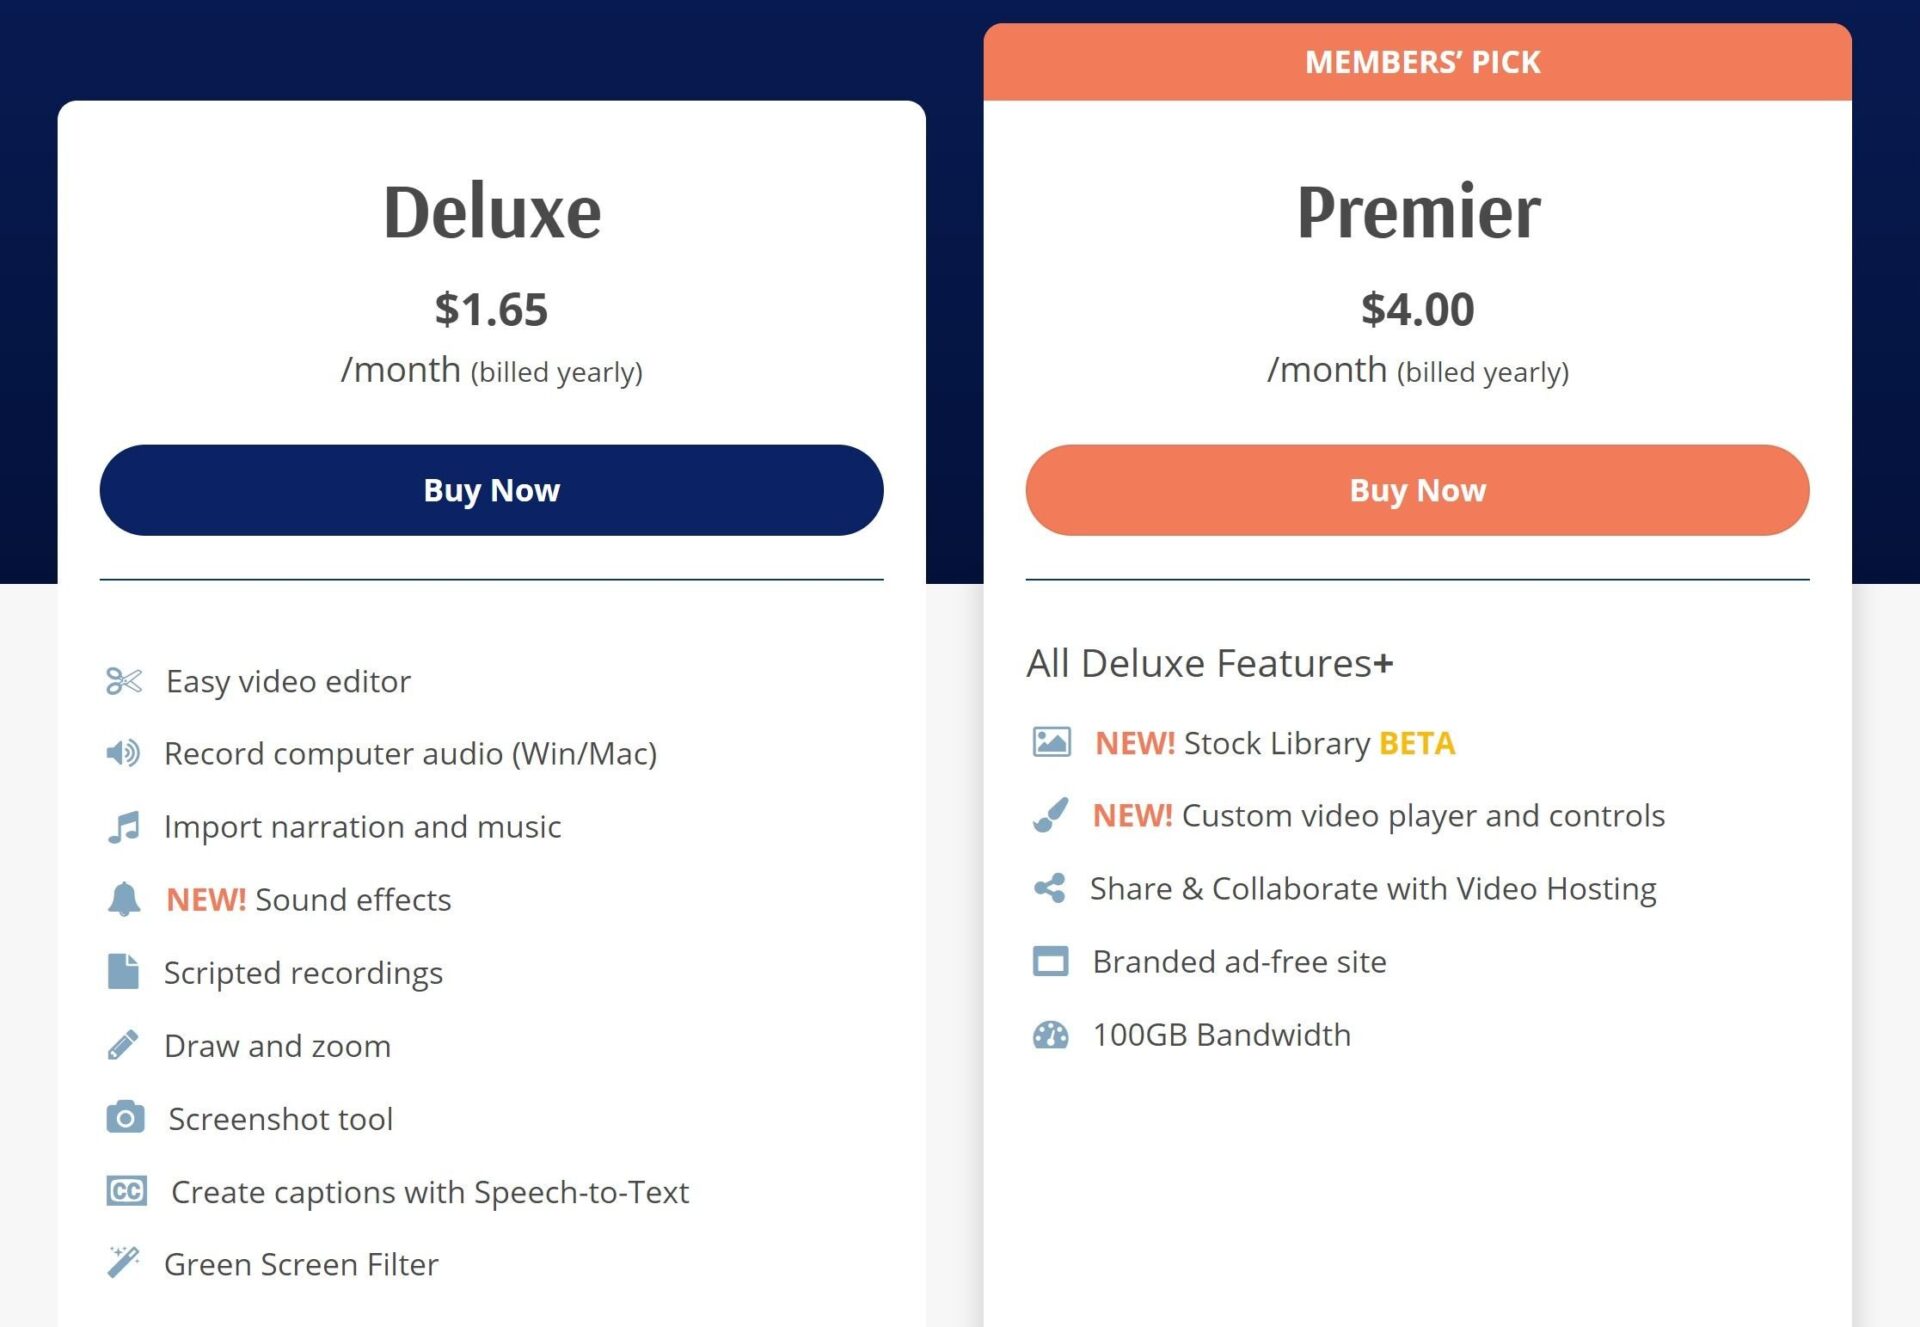
In order to enjoy the full list of features that Screen-Cast-O-Matic has to offer, you’ll need to upgrade to one of its paid plans. It has two upgrade options: Deluxe and Premier.
Both are relatively inexpensive at $19.80/year for Solo Deluxe and $48/year for Solo Premier. By upgrading, you’ll get access to the video editor that lets you make changes to your videos after they’ve been recorded. With the Solo Deluxe plan, you can record computer audio, import narration, import music, use sound effects, draw on-screen, and use a green screen filter.
Solo Premier contains all the same features as Solo Deluxe, and also includes a stock library of images, custom player controls, and up to 100GB of bandwidth.
Screen-Cast-O-Matic also has different pricing for companies. It offers similar features, but at different price points that depend on how many people need to use the software. Team Deluxe starts at $12/month for 10 users, while Team Premier starts at $20/month.
There are slight differences between what is offered for the Team plans when compared to the Solo plans. For example, the Team Premier plan offers up to 250GB of bandwidth, compared to the 100GB of bandwidth offered by the Solo Premier plan.
Keep in mind that there is no free version of the Team plans for Screen-Cast-O-Matic.
Managing Screen-Cast-O-Matic
With a tool as powerful and as Screen-Cast-O-Matic, it’s important you are regularly organizing and managing your channels for efficiency.
Creating channels that are for specific jobs or businesses can save you valuable time from having to scroll or search through individual videos. Make sure you organize your channels before letting your unlimited recordings get out of control.