Getting in touch with one’s inner Dr. Frankenstein in the editing bay is something that we can all relate to.
The delicate, minute calculus of one painstakingly crafted scene falls elegantly into the next. One false move, however, and two weeks of work has suddenly been shattered—B-roll everywhere it shouldn’t be, and dialogue mysteriously out of sync. Where did we go wrong?
Nesting sequences envelopes your masterpiece in a protective, foolproof container. You’ll be able to shuffle things around with gleeful abandon, assured that everything within will be safe and sound.
What Is Nesting in Premiere Pro?

Think about exporting a project. When the program renders your timeline, you can see that your output file, the MP4, or whatever it may be, is one single unit. You put it up online, and your audience doesn’t really see any of the layers that make up what they see in their browsers.
An exported project “bakes in” all of these behind-the-scenes details, giving you a neat and tidy video file that won’t change after the fact.
Nesting a sequence in Premiere Pro is sort of like this, to an extent. Instead of cementing each element in permanently, a nested sequence can still be modified from the inside. It stores all of these details inside of a solid “clip” in your timeline that you may grab, drag, and drop at will without worrying about shaking anything up.
“Stepping in” with a double-click puts you right back into the fray; everything nested will now exist in an embedded timeline that contains only what was selected at the time that you nested it.
The nested sequence changes dynamically as you work, so you never have to worry about rerendering after “stepping out,” back into the main timeline that it finds itself a part of. You can trim the “clip,” extending or retracting as necessary.
Worthy of note: you can also apply this feature to a single clip as well. It doesn’t have to be a multi-clip selection.
Why Use Nested Sequences in Premiere Pro?
Nesting has got to be one of the most useful tools in Premiere Pro. Aside from the organizational benefits of nesting sequences, there are several other practical reasons that serve more specific needs.
Nesting brings whatever you’ve got selected up to speed with your chosen sequence settings. For example, a 4K piece of footage will be scaled down to match the 1080 sequence that contains it.
Fans of the Warp Stabilizer will be able to nest the clips that they would like to stabilize and apply the effect without hassle. This is very convenient if you happen to be working with material from multiple sources, such as mixing DSLR footage with drone footage that you would like to crop into on the fly.
Transitions between scenes have also now become much more manageable. Instead of messing around with timing fades to coincide perfectly, you can just toss one on at the end of your nested sequence and call it a day.
Nested sequences are also really useful if you’ve got a complicated slug that makes an appearance many times throughout the project. You can modify the segment globally by stepping into the original once without worrying about missing an instance.
If you have a very long and complex sequence that taxes your system inordinately, hiding the mess inside of a nest will allow you to continue working without Premiere crashing constantly.
How to Nest a Sequence in Premiere Pro
Presumably, you’ve already got something chaotic in front of you. Pull up the project in question and open the sequence containing the timeline that you would like to work with.
In this case, we will use the example of a multi-clip sequence to demonstrate. Select the area that you would like to nest by clicking and dragging, or by holding down Ctrl and clicking the relevant parts of the project.
Right-click the selection and choose to Nest them from the context menu.
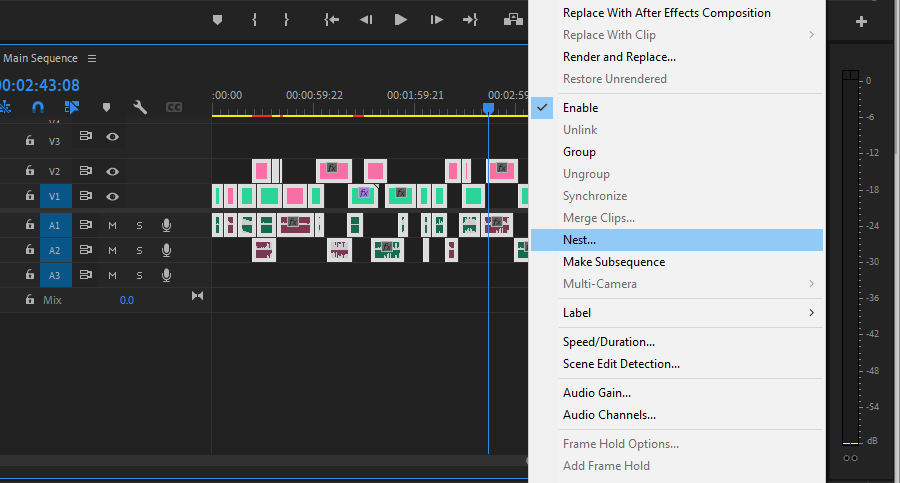
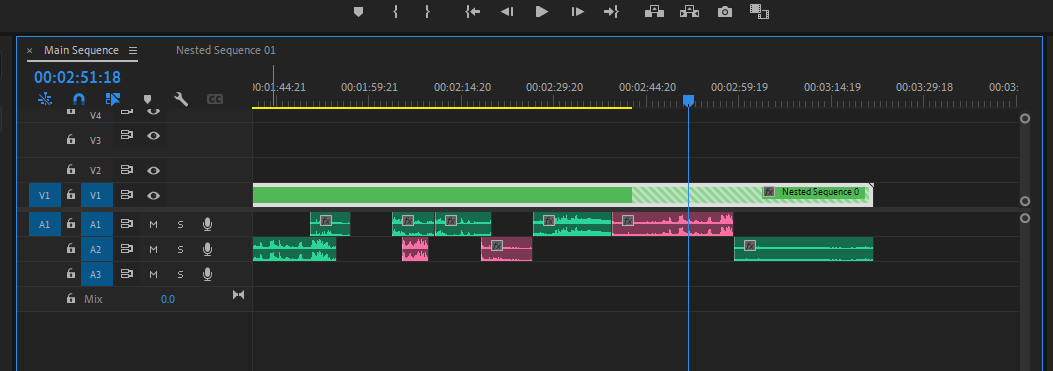
Now, you will see that everything selected has been contained. The audio still appears to be separate, but all of the selected assets will also have been brought into the nested sequence.
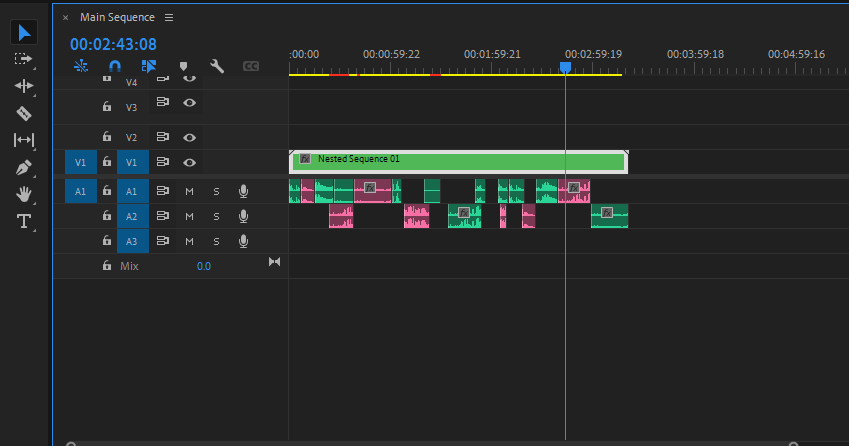
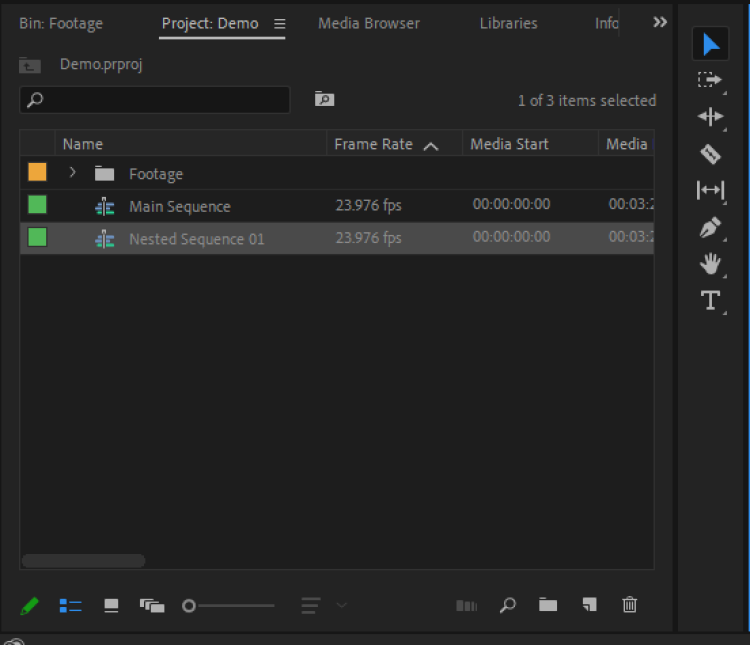
The nested sequence has been saved to the bin that the sequence is in, under its own name. We recommend that you rally these clips as you go, naming them uniquely and filing them in organized folders—they tend to pile up.
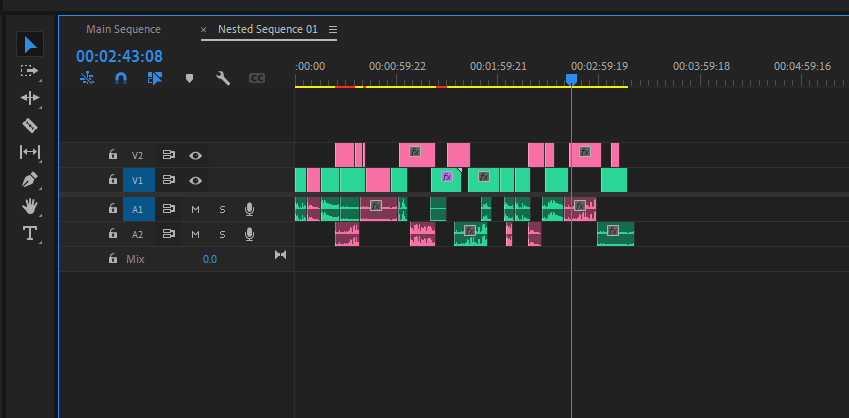
To step into the nest, double-click on the nested clip in the timeline. Everything is exactly as it was. You will notice that, while your audio clips are still preserved outside of the nested sequence, all of the selected clips will have found their way to the inside, just like the video footage.
Try retracting the back end of it, and navigate back to your master timeline. The diagonal lines that you see at the end indicate that you have it pulled out longer than the source material runs. Now, where before there was video, you will see only a black screen.
Extending the back end of the sequence from the inside of the nest will populate this area with footage again, allowing you to fill the gap in with what was there before. All of this will be accounted for as you make these changes. This is what makes nesting sequences such a flexible tool.
Can You Nest Audio and Video Separately?
Video brought into Premiere Pro is automatically linked to the native audio that comes with it. Both are selected when you click on one or the other in the timeline. They will both be nested together as a result.
Unlinking your media is as easy as right-clicking the clip (or clips) in question and selecting Unlink. You’re now free to tear them asunder and work with them separately, no questions asked.
Can You Un-Nest a Sequence in Premiere Pro?
Well, the short answer is: not really.
If you happen to have done the deed and would like to make things as they once were, you can still change this. Simply grab the nested clip (or clips) from the nested sequence, and bring them back into the main timeline. You can do this either by clicking and dragging or by copying and pasting.
Primitive? You bet. In times of dire need, we do what we can.
Achieve a Shipshape Timeline in No Time
Nothing screams “professional” like a sound, stable project free of clutter. We recommend nesting your sequences if you often find yourself with footage hanging on by just a thread. That, and for its transformative power akin to clearing off your desktop after a rough week.
Clearing one’s thoughts in the editing bay has never been easier. Out of sight, out of mind.