Sway is one of Microsoft’s handiest platforms. With it, you can create all kinds of online documents, including curriculum vitae. What makes it special is the quality and functionality of its creations.
Here’s a step-by-step guide to help you create your CV using Sway. The platform can give it an attractive and professional appearance, while you provide the content and personalization.
1. Create a New Sway
Once signed in, you’ll find a range of options. If you want to get a feel for how everything works or what you can expect from your documents, explore Sway’s tutorials and featured creations before starting your project. You might get some ideas along the way.
Use a Template
The easiest way to start the process is with one of Sway’s premade templates, especially if you’re new to the software. On your homepage is a gallery of options, from newsletters to portfolios. There are a few CVs to choose from, depending on how you want to present yourself.
Are you a writer, artist, or entrepreneur? Select a template, and it’ll show you a rough preview of what the CV will look like. Click on Start editing this Sway, and you’ll enter the editor, where you can make the template your own.

Start From Scratch
Another option is to go for a blank Sway. From the homepage, just click Create New, and the program will launch the editor. Unlike a template, you’ll only have one customizable card to start with. It’s up to you to add the rest of the content.
If you have a recent CV or have been using apps for eye-catching resumes, it should be easy enough to transfer the information to your Sway and present yourself in a whole new professional light.
2. Edit Your Sway’s Storyline
Whether you choose a template or blank slate, the tools on offer are the same. That said, when it comes to editing the CV’s storyline, each available card can have unique as well as common features.
Text Tools
Let’s start with your CV’s title as an example. Here you can type in your text, make it bold or italicized, and add a link. You can edit more than that later. For now, you can also have a logo and background image, adjusting the latter’s focus point so that it makes the best possible impact.

If you click the plus button at the bottom of the card, you can add more content like text cards. With these, you have the same editing options as the title card, in addition to bullet points and numbered lists.
Additionally, you can quickly turn them into headings by clicking the said button on the top left corner. However, the tool will only affect the text after your cursor.
So, if you want the whole card to change, put the cursor before the very first word. Otherwise, the card will split, leaving anything before the cursor as plain text and using the rest as a heading.
Grouping Tools
Headings other than the title card work a bit differently. When you add one, Sway starts you off with a box containing an H1 heading, which you can adjust like the CV’s title. If you click the plus button directly under the H1 card, you’ll be offered an H2 heading alongside other content.
Whatever you add within this box is automatically grouped, but you can also separate the box’s content into more groups, for example, to create a neat list of images or links under the same heading. Rearranging cards is just as easy by clicking and dragging them around.

Another way to merge content is through the plus button and its Group tab. There you can choose between five types of groups: grid, comparison, stack, slideshow, and automatic. After selecting one and adding your content, click Design or Play on your dashboard to see what each function does.
Image Tools
Multimedia is a great way to enhance your CV, and Sway lets you insert anything you need. Whether in a group or individually, you can add images, videos, audio, Tweets, 3D content, and more with the same plus button. So, consider using tools like editing software for YouTube videos too.
In terms of improving your online document’s look even more, you can change the so-called emphasis of some cards from subtle to moderate or intense. This makes their contents bigger or smaller, drawing the eye to the most important parts of the resume.
3. Edit Your Sway’s Design
The Design tab gives you a preview of your Sway. It’s here that you can change its appearance in extra detail through the Styles button. Click that, and you’ll find a selection of designs.
Do you want the CV to appear vertically, horizontally, or in slides? Do you prefer a serif typeface and colored frames for your headings? The whole document can have a textured background.
Choose a style and click Customize, which opens up more options. You can change the color palette, font, text size, and animation emphasis. If you can’t make up your mind, you could always click the Remix button and let Sway do random customization.

4. Preview Your Sway
When you’re happy with the CV’s design, take a final good look with the Play button. You can scroll through the document and let it perform as directed. Inspect all its features, from structures to animations, making sure nothing is out of place.
You can adjust the autoplay settings too, so you can enjoy the presentation at different speeds and even layouts. Try the slideshow design, for example, in case it works better with your content. If you want to fix something specific in the Sway, just click Edit.
Finally, you can invite people to work on the document with you. Click Share and then edit where it asks what your invitation is for. Copy the URL it provides and give it to your team members. Additionally, you can add a password and decide whether to make the sharing tools visible.
5. Export Your Sway
Once there’s nothing left to add or check, it’s time to export the document. From the Share button, you can invite people to view the CV via the plain or visual link, social media post, and embedded widget.
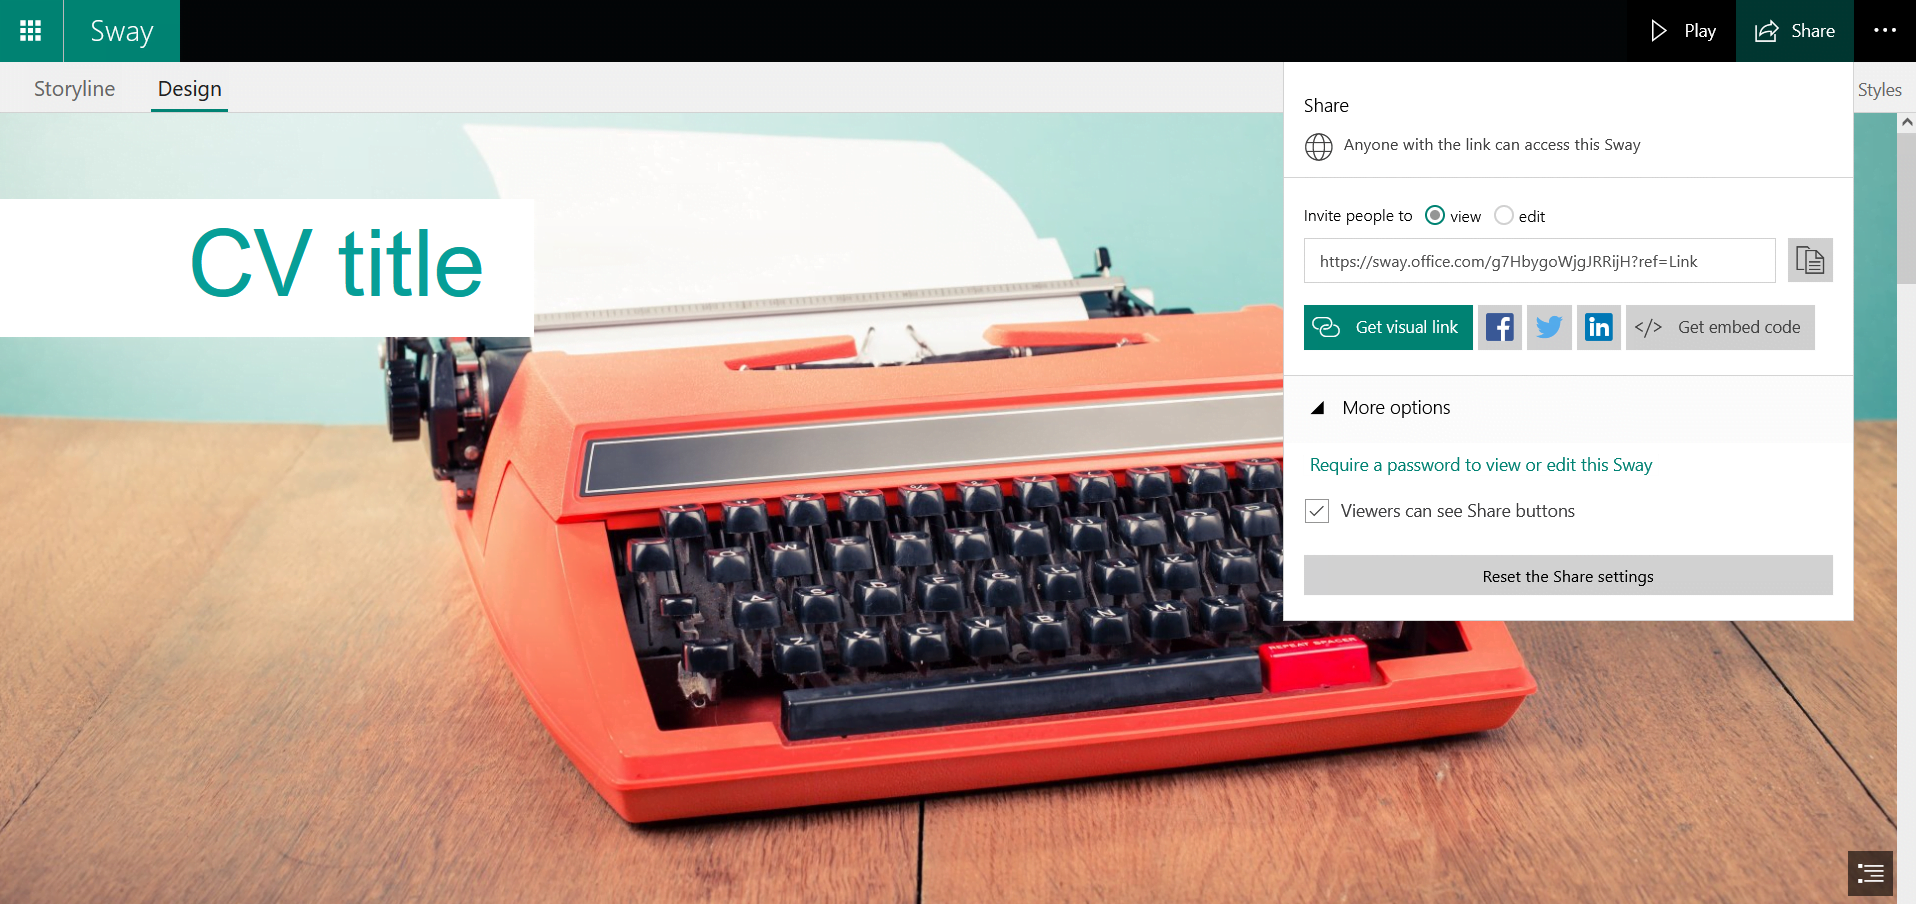
Next to Share are three dots for more options. In the dropdown menu, you can copy, save as a template, toggle text direction, and set accessibility features and how much freedom viewers have.
In this particular step, you’re looking for Print and Export options. The former turns the document into a printable PDF. The latter does the same, but you get to download your digital CV instead, which can also be in Microsoft Word form.
Get to Know the Perks of Microsoft Apps
Thanks to Microsoft, Windows users have access to great tools for different tasks. Sway takes the simple need for a good-looking CV and delivers impressive online documents alongside a high-end user experience.
Apart from other forms available on the platform, see Microsoft’s full scope of apps and what they can do for you. There are even ways to try them out without investing in a proper license. Taking the time to explore can benefit you and your career.